Simple Android Login Page
On this page (7sections)
Simple Android Login Page
The blog post guides Android developers on creating a straightforward login page for their applications. It covers the essential components and layout structure required to design a login screen. The tutorial explains the usage of key XML elements such as ScrollView, LinearLayout, ImageView, TextInputLayout, EditText, Button, and TextView. Additionally, the post introduces the ButterKnife library, which simplifies the process of view binding in Android development. By following this tutorial, developers can learn how to create an aesthetically pleasing and functional login page while gaining insights into best practices for user interface design and view binding in Android applications.
ScrollView
The ScrollView is a layout container that allows scrolling when the content inside exceeds the screen height. In this case, it wraps around the entire layout and defines the background color as #b2ebf2 (light blue).
<ScrollView xmlns:android=“http://schemas.android.com/apk/res/android”
xmlns:tools=“http://schemas.android.com/tools”
android:layout_width=“fill_parent”
android:layout_height=“fill_parent”
android:background=“#b2ebf2”
android:fitsSystemWindows=“true”>
LinearLayout
The LinearLayout is a vertical container that holds the login form elements. It has a width of match_parent, which means it will occupy the entire width of the screen. The paddingLeft, paddingTop, and paddingRight attributes add spacing around the elements inside.
<ImageView
android:layout_width=“wrap_content”
android:layout_height=“150dp”
android:layout_gravity=“center_horizontal”
android:layout_marginBottom=“25dp”
android:src=“@mipmap/ic_launcher” />
ImageView and TextInput
The ImageView displays an image at the center of the layout. It has a height of 150dp and uses the ic_launcher image as the source. The layout_gravity attribute centers the image horizontally, and layout_marginBottom adds a margin at the bottom.
The rest of the XML code defines the email and password input fields, login button, and signup link. To explain each element in detail would be repetitive, as they follow a similar structure. However, it’s worth mentioning that the TextInputLayout is used to wrap the EditText fields, providing additional features like the floating label effect and error handling.
<ImageView
android:layout_width=“wrap_content”
android:layout_height=“150dp”
android:layout_gravity=“center_horizontal”
android:layout_marginBottom=“25dp”
android:src=“@mipmap/ic_launcher” />
Full Source for Login XML
<ScrollView xmlns:android=“http://schemas.android.com/apk/res/android”
xmlns:tools=“http://schemas.android.com/tools”
android:layout_width=“fill_parent”
android:layout_height=“fill_parent”
android:background=“#b2ebf2”
android:fitsSystemWindows=“true”>
<LinearLayout
android:layout_width=“match_parent”
android:layout_height=“wrap_content”
android:orientation=“vertical”
android:paddingLeft=“24dp”
android:paddingTop=“80dp”
android:paddingRight=“24dp”>
<ImageView
android:layout_width=“wrap_content”
android:layout_height=“150dp”
android:layout_gravity=“center_horizontal”
android:layout_marginBottom=“25dp”
android:src=“@mipmap/ic_launcher” />
<android.support.design.widget.TextInputLayout
android:layout_width=“match_parent”
android:layout_height=“wrap_content”
android:layout_marginTop=“8dp”
android:layout_marginBottom=“8dp”>
<EditText
android:id=”@+id/password”
android:layout_width=“match_parent”
android:layout_height=“wrap_content”
android:hint=“Email”
android:inputType=“textEmailAddress” />
</android.support.design.widget.TextInputLayout>
<android.support.design.widget.TextInputLayout
android:layout_width=“match_parent”
android:layout_height=“wrap_content”
android:layout_marginTop=“8dp”
android:layout_marginBottom=“8dp”>
<EditText
android:id=”@+id/input_password”
android:layout_width=“match_parent”
android:layout_height=“wrap_content”
android:hint=“Password”
android:inputType=“textPassword” />
</android.support.design.widget.TextInputLayout>
<android.support.v7.widget.AppCompatButton
android:id=”@+id/btn_login”
android:layout_width=“fill_parent”
android:layout_height=“wrap_content”
android:layout_marginTop=“24dp”
android:layout_marginBottom=“24dp”
android:padding=“12dp”
android:text=“Login” />
<TextView
android:id=”@+id/link_signup”
android:layout_width=“fill_parent”
android:layout_height=“wrap_content”
android:layout_marginBottom=“24dp”
android:gravity=“center”
android:text=“No account yet? Create one”
android:textSize=“16dip” />
Manifest
<activity
android:name=”.Login”
android:label=“@string/title_activity_login”
android:parentActivityName=”.MainActivity”
android:theme=“@style/AppTheme.NoActionBar”>
<meta-data
android:name=“android.support.PARENT_ACTIVITY”
android:value=“com.thiyagaraaj.apptrace.MainActivity” />
This code snippet declares an activity called “Login” in the manifest file. The android:name attribute specifies the class name for the activity, which is .Login. The android:label attribute assigns a string resource to be used as the activity’s label. The android:parentActivityName attribute defines the parent activity for this activity, which is .MainActivity. The android:theme attribute sets the theme for this activity to “AppTheme.NoActionBar,” indicating that it does not have an action bar.
Bind to Java
@BindView(R.id.input_email) EditText _emailText;
@BindView(R.id.input_password) EditText _passwordText;
@BindView(R.id.btn_login) Button _loginButton;
@BindView(R.id.link_signup) TextView _signupLink;
To read values
String email = _emailText.getText().toString();
String password = _passwordText.getText().toString();
These lines of code use the @BindView annotation from the ButterKnife library to bind the XML views to their respective Java objects.
@BindView(R.id.input_email) EditText _emailText;
- This line binds the view with the ID input_email from the XML layout to the EditText object _emailText. It represents the email input field.
@BindView(R.id.input_password) EditText _passwordText;
- This line binds the view with the ID input_password from the XML layout to the EditText object _passwordText. It represents the password input field.
@BindView(R.id.btn_login) Button _loginButton;
- This line binds the view with the ID btn_login from the XML layout to the Button object _loginButton. It represents the login button.
@BindView(R.id.link_signup) TextView _signupLink;
- This line binds the view with the ID link_signup from the XML layout to the TextView object _signupLink. It represents the signup link.
By using the @BindView annotation, ButterKnife automatically initializes these Java objects with the corresponding views from the XML layout, saving you from manually calling findViewById for each view.
After binding the views, you can then use these objects to interact with the UI elements in your Java code. For example, you can retrieve the text entered in the email and password fields by calling _emailText.getText().toString() and _passwordText.getText().toString(), respectively.
Overall, ButterKnife simplifies the view binding process and reduces boilerplate code, making it easier to work with UI elements in Android development.
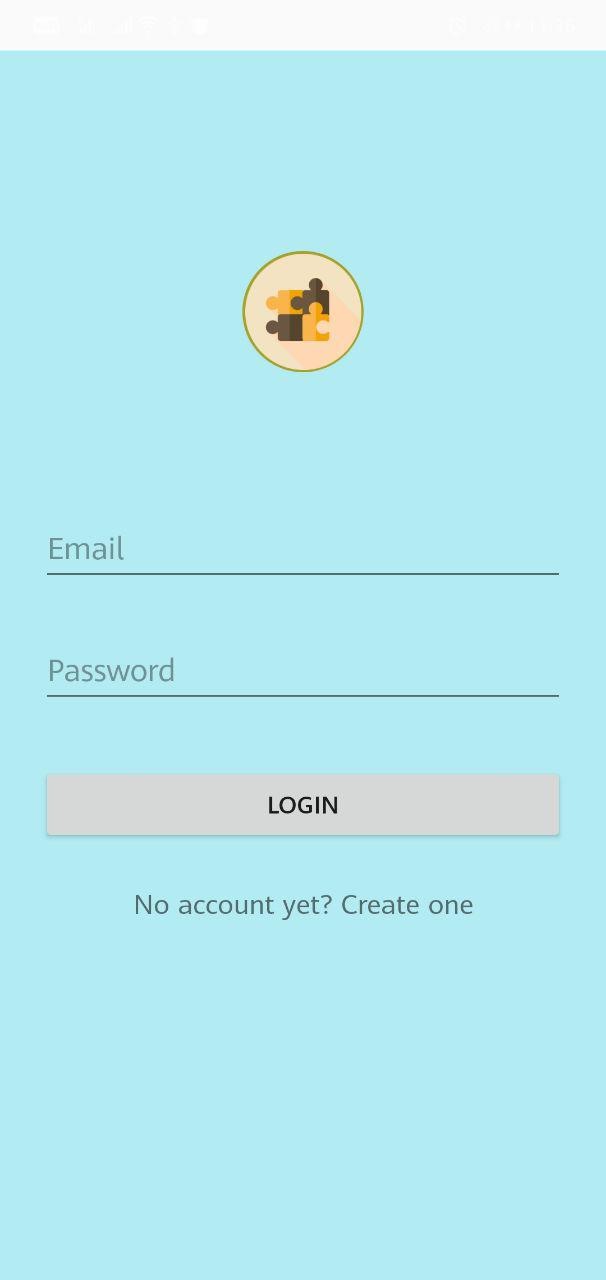
Demo Screen
Related Tutorials
Android WebView Handling Orientation Changes: Saving State
Android WebView is a component that allows developers to display web content within their applications. When the device undergoes orientation changes (e.g., fro
Read tutorialIncoming Phone Call Receiver - Android Broadcast Receiver
- BroadcastReceiver: In Android, a BroadcastReceiver is a component that responds to broadcast messages sent by the system or other applications. It allows...
Read tutorialSimple Android Sign up screen
Building a user signup screen is a fundamental aspect of many Android applications. It allows users to create accounts and access the app's features and functio
Read tutorial